The Basic Cox Low Back Exercise Program to Accompany chiropractic Management of Low Back Pain
General Instructions
- Do these exercises on a firm surface such as the floor with or without a mat.
- If you experience pain during any exercise, stop and consult your doctor before continuing.
- The Basic Cox Low Back Exercise Program is used in conjunction with your chiropractic care and should be discussed with your chiropractic physician before use.
- Do only the exercises the doctor has recommended for you.*
Exercise 1. Pelvic Tilt (Abdominal Tightening)
- While standing or lying on your back, tighten the abdominal and buttock muscles so as to flatten your back.
- NOTE: If lying, flatten your back against the surface.
- Contract the muscles for a slow count of 4.
- Relax the muscles for a slow count of 4.
- Repeat 6 times each session.
Exercise 2. Pelvic Lift (Abdominal Tightening)
- Lie on your back with your knees flexed and your feet flat on the floor as close to the buttocks as possible.
- NOTE: Keep your knees together.
- Tighten the muscles of the lower abdomen and buttocks so as to flatten your low back against the floor.
- Slowly raise your hips up off the floor, and hold for slow count of 4.
- Repeat this exercise 6 times.
- NOTE: If you cannot raise your hips from the floor, merely tighten the belly, the abdominal and buttock muscles, and wait until you are strong enough to raise the hips.
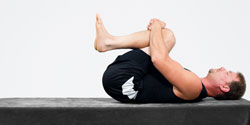
- Lie on your back.
- Draw your right knee up to your chest, and pull the knee down upon your chest.
- Do this for a slow count of 4. Repeat this exercise 6 times with the right knee. Relax between each knee-chest exercise for a few seconds.
- Repeat the same exercise with left knee brought to the chest.
- Repeat with both knees brought up to the chest.
- Do this for a slow count of 4. Repeat this exercise 6 times.
If acute back pain is present, perform only the first three exercises. After the acute pain diminishes, do the following exercises if you feel no pain in your low back upon coughing, sneezing, or straining to move the bowel. Follow doctor’s orders on increasing exercises.
Exercise 4. Hamstring Stretch
NOTE WHY: The hamstring stretch is a very important exercise as tight hamstrings limit flexion of the pelvis at the hip joints and force you to move your back more than necessary for forward bending at the waist.
NOTE HOW: Stretching hamstrings can be done in a number of ways. PNF (proprioceptive neuromuscular facilitation) technique is the preferred method to stretch hamstrings. It is a combination of contraction against resistance, rest, and stretching. PNF requires an assistant though, so if you don't have an assistant, we present an alternative method for you to make your own resistance as detailed below.
PNF Method with an Assistant
- Lie on your back.
- Have your assistant hold your ankle/foot, and hold your knee straight.
- The assistant lifts the leg as high as the hamstring muscle length will allow.
- Have your assistant hold this position.
- Push against your assistant's resistance for a count of 8.
- Stop pushing and relax the hamstring muscles.
- While the hamstring muscle is relaxed, stretch the hamstring muscle by slowly and steadily flexing the hip by having the assistant push upward on the patient’s ankle and leg. Hold this stretch for a count of 8.
- Repeat 3 times with each leg.
PNF Method with a Towel
- Lie on your back.
- Use a towel to push against for a count of 8. Rest.
- Pull your leg towards you by pulling on the towel.
- Hold this stretch for a count of 8.
- Repeat 3 times with each leg.
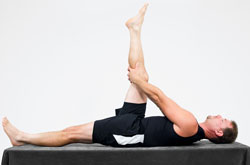
PNF Method Alone
- Lie on your back.
- Raise one leg straight upward without bending the knee.
- Place your hands behind the knee while keeping the knee straight.
- Raise the leg straight upward as far as possible
- Push against your hand resistance for a slow count of 8
- Stop pushing against your hand resistance and pull the leg straight up so as to stretch the hamstring muscles behind your thigh.
- Hold for a count of 8. Repeat this 3 times with each leg.
Exercise 5. Abdominal Strengthening Exercise
- Lie on your back.
- Bend your knees with your feet flat on the floor.
- Either cross your arms over your chest or place hands behind the head to support the head and neck.
- Flatten your spine against the floor.
- Raise the shoulders off the floor by contracting the abdominal muscles.
- NOTE: Feel the abdominal muscles contract and tighten.
- Raise the shoulders upward slowly until you feel the abdominal muscles tighten.
- Relax the abdominal muscles.
- Allow the shoulders to return to the floor.
- Repeat this exercise as many times as possible starting with as many repetitions as you can do comfortably.
- NOTE: Make 50 to 75 repetitions your goal.
Exercise 6. Buttock Muscle Strengthening Exercise
- Lie on your stomach. Place your chin on your hands.
- Turn your right foot out.
- Tighten the buttock muscle, and raise the right leg off the floor while keeping the knee straight.
- Hold this for a slow count of 4.
- Slowly let the leg down.
- Repeat this 6 times with the right leg.
- Repeat on the left, 6 times for a slow count of 4.
Exercise 7. Low Back Strengthening *
- Lie flat on stomach with arms along side your body, palms up.
- Slowly raise your chest from the floor.
- Feel the muscles of the low back tighten.
- Hold the chest up from the floor for a slow count of 4.
- Slowly let the chest down.
- Rest a few seconds between each session.
- Repeat this 6 times.
* Only do this exercise upon approval from your physician.
Exercise 8. Outer Thigh and Hip Stretch
Stretching the buttock and hip muscles is done with PNF (proprioceptive neuromuscular facilitation) technique as well.
PNF Assistant Method
- Lie on your back.
- Place your left foot on outside of your right knee.
- Push the left knee to the left against the assistant’s resistance.
- Hold for a slow count of 8.
- Relax.
- Have your assistant pull the left knee to the right.
- This stretches the outside left hip and buttock muscles.
- Repeat with your right foot on the outside of your left knee.
NOTE: Do this 6 to 8 times on each side.
PNF Method Without Assistant
NOTE: Do this 6 to 8 times on each side.
- While sitting, place your left foot on the outside of your right knee.
- Resist your outward push of the left knee by placing your hand on the outside of the left knee and pushing against the hand resistance.
- Hold this pressure for a slow count of 8.
- Relax.
- Push the left knee to the right to stretch the left hip and buttock muscles.
- Repeat with your right foot on the outside of your left knee.
Exercise 9. Inner thigh stretch
Stretching the inner thigh muscles is done with PNF (proprioceptive neuromuscular facilitation) technique as well.
PNF Assistant Method
NOTE: Repeat 6 to 8 times on each side.
- Lie on your back. Place your left foot/ankle on your right knee with the knee lying as far down as possible.
- Have your assistant push against/down on the left knee as you push up.
- NOTE: This forces the left inner thigh muscles to contract.
- Hold this pressure for a slow count of 8.
- Have your assistant stop pushing, and relax the muscle contraction of the inner thigh muscles.
- Force the knee downward to stretch the inner thigh muscles.
- Stretch like this for a slow count of 4 or until a stretch of the inner thigh muscles is felt.
- Repeat with your right foot/ankle on your left knee.
PNF Alone Method
NOTE: Repeat 6 to 8 times on each side.
- Sit upright. Place your left foot/ankle on your right knee.
- Let the knee fall downward.
- Use your hand to resist as you push your left knee up.
- NOTE: This forces the left inner thigh muscles to contract.
- Hold this pressure for a slow count of 8.
- Relax the muscle contraction.
- Force the knee down by using your hand pressure to push.
- Stretch like this for a slow count of 4 or until a stretch of the inner thigh muscles is felt.
- Repeat with the right foot/ankle on your left knee.
Exercise 10. "Exercise before arising in morning"
Before getting out of bed in the morning, do the combination of exercises 3 & 4 while lying in bed.
This eliminates the excuse of “I don’t have time to exercise!” and benefits your spine by warming up your muscles before you have to use them.
Do this routine slowly. It will stretch your low back and thigh muscles to allow greater comfort on arising to weight-bearing posture.
- Pull your knees to your chest.
- Hold for a slow count of 4.
- Repeat 6 times.
- Hold your right leg behind the knee to stretch the hamstring.
- Keep your right knee straight.
- Hold for a slow count of 4.
- Repeat 6 times.
- Hold your left leg behind the knee to stretch the hamstring.
- Keep your left leg straight.
- Hold for a slow count of 4.
- Repeat 6 times.
- Slowly get out of bed.
- Roll to your side.
- Rise up on one elbow
- Swing your legs off the side of the bed.
- Push up to a sitting position.
- Slowly rise, using your leg muscles to stand.
- Move slowly and purposely in the morning.
* Disclaimer
These exercises are presented for demonstration purposes only. They are not recommendations for you specifically. Consult with Gormish Chiropractic & Rehabilitation about what is best for you. Do not start any exercises without doctor approval and recommendation. Only do these exercises if you are recommended to do so by your doctor. Listen carefully to any modifications your doctor gives you for each exercise. Only do the exercises to your tolerance. Do not do or continue to do any exercise that causes you pain or discomfort. If you experience any pain, stop the exercises and discuss with your doctor. If you have any questions about the appropriateness of any exercise, ask your doctor at Gormish Chiropractic & Rehabilitation before proceeding.